Hacking the RV Internet Part 1: Taking Direct Control of the Magnadyne RVLink RV2400
- Part 2: RVLink Roof Unit Deep Dive Part 2: Firmware Secrets and API Mapping
- Part 2.5: Rooting the RVLink MV2400: A Deep Dive into Configuration Backup/Restore Vulnerabilities (RVLink hacking part 2.5)
- Kings of the Castle: Achieving Total Webcfg Auth Bypass in RVLink Firmware
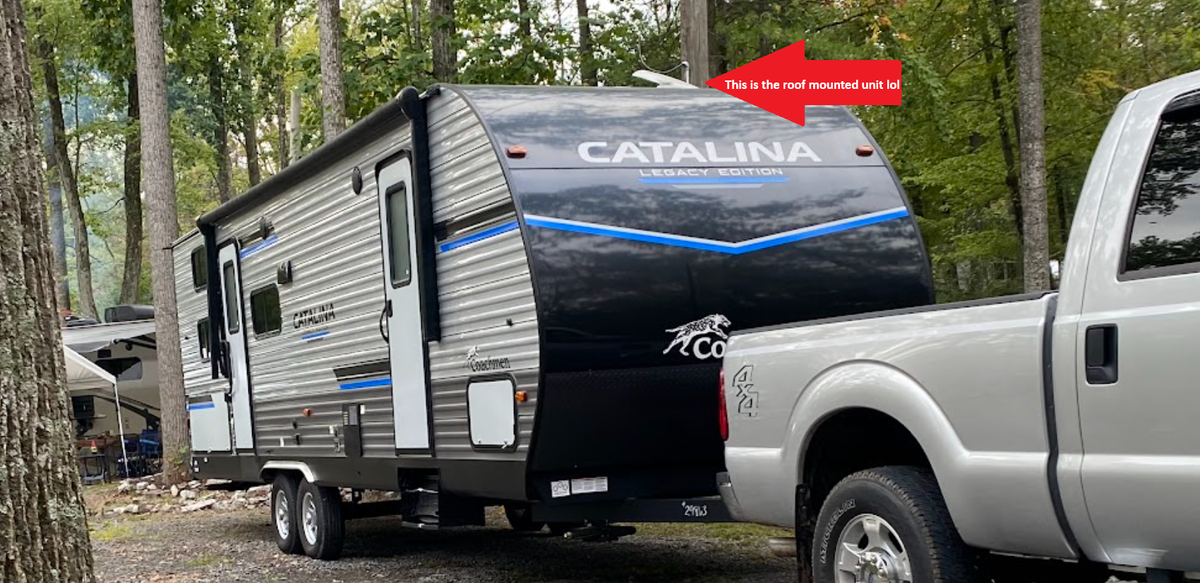
I cannot leave things alone – it's just how I'm wired. My parents could tell you stories about things I disassembled as a kid. So, when I got my camper last year, it came as no surprise that I eventually zeroed in on its tech, specifically the Magnadyne RV-Link system – sometimes called a "Wi-Fi booster." It's designed to connect to campground Wi-Fi and rebroadcast a private network inside the RV. This setup is genuinely useful: it simplifies campground logins since only one device (the booster) needs authenticating, and its roof-mounted high-gain antennas definitely help pull in weaker signals. But even though it worked reasonably well, "reasonably well" isn't my endgame. I craved deeper control and integration with my own network gear... because, well, I cannot leave things alone.
Many RVs come equipped with systems like the Magnadyne RV-Link, designed to make connecting to campground Wi-Fi easier. These systems typically pair an outdoor roof antenna/modem unit with an indoor router/controller. While convenient, the standard interface often lacks the advanced control needed for power users (me), especially those wanting to integrate with sophisticated routers (me) like MikroTik for features like WAN failover, policy routing, or scripted Wi-Fi roaming.
This post chronicles a journey to bypass the standard indoor controller (RV2458) and gain direct programmatic control over the RVLink roof unit (RV2400/RV2402) API, integrating it as a controllable WAN source for a MikroTik Chateau router.
Understanding the System: The Players
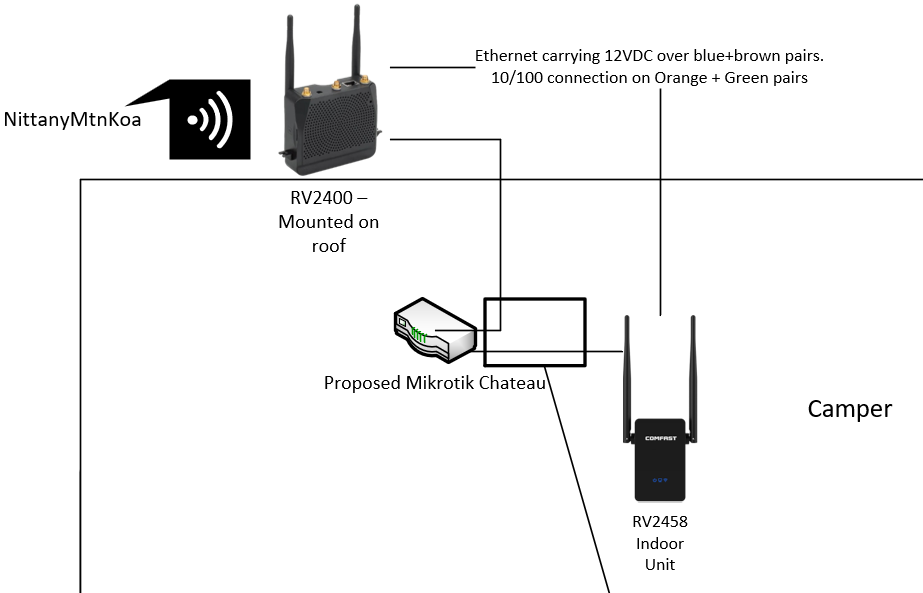
The RV-Link system consists of two main parts:
- Indoor Unit (Controller - RV2458):
- IP:
192.168.10.1 - Function: Provides the user interface (Web GUI via eCos Embedded Web Server), powers the roof unit via Power over Ethernet (PoE), and likely acts as the primary configuration manager.
- Hardware Base: Identified via API as likely based on a COMFAST CF-WR305S.
- IP:
- Roof Unit (Target - RV2400/RV2402):
- IP:
192.168.10.254(Static, assigned by the indoor unit) - Function: Handles the actual Wi-Fi WAN connection (and sometimes LTE). Hosts the core control API (nginx web server, CGI-based). Runs an SSH server (Dropbear).
- Hardware Base: Research strongly suggests this is an OEM version of a Comfast outdoor CPE, likely the CF-E110N or CF-E130N. This was deduced from the MAC address OUI (40:A5:EF belonging to Comfast's parent company) mentioned in Magnadyne's own manual, combined with the unit's 2.4GHz 802.11n client capabilities, outdoor design, and PoE power requirements matching these Comfast models.
- IP:
Unlocking the API: Finding the Keys
Direct web access to the roof unit's root (http://192.168.10.254/) fails. However, by analyzing the indoor unit's Javascript files, key API endpoints on the roof unit were discovered:
- Authentication: A
POSTrequest to/cgi-bin/loginwith JSON payload{"username": "admin", "password": "admin"}. Success returns aCOMFAST_SESSIONIDcookie required for subsequent calls. (Note: Initial attempts withcurlfailed with 400 errors; switching to Pythonrequestswith session management resolved this. Sometimes a login retry is needed if the first cookie is expired). - Main Endpoint:
/cgi-bin/mbox-configusingPOSTrequests (even for fetching data), withmethodandsectionparameters in the URL. - Key API Calls Identified:
GET wifi_scan(Payload:{"ifname":"radio0"}): Scans for Wi-Fi networks.SET motorhome_config_set(Payload:{"motorhome": {"ssid": ..., "bssid": ..., "encryption": ..., "key": ...}}): Connects to a specific Wi-Fi AP.GET firmware_version_get: Gets firmware details.GET guide_config: Gets overall status, including current WAN connection.GET get_ec20_status_info: Gets LTE status (if applicable).SET system_reboot: Reboots the roof unit.
The "Commit" Conundrum: An Unexpected Dependency
A major hurdle appeared when trying to change the Wi-Fi connection via the motorhome_config_set API call. While the API call returned success (200 OK), the roof unit would often revert to its previous connection.
Analysis of the indoor unit's UI flow revealed the missing piece: After the roof unit successfully processes the connection request (confirmed by its scan_list_mobile.js redirecting to set_ok_m.html), that confirmation page immediately triggers a request back to the indoor unit at http://192.168.10.1/data/set_setting.html. This seems to be a notification required to make the configuration change persistent. Controlling the roof unit entirely independently via its API was therefore problematic using the standard workflow.
Getting Direct Access: The "Network Tap" Solution
To reliably control the roof unit's API from the MikroTik router (on a different subnet, 192.168.69.x), direct network access to the 192.168.10.x segment was needed. The indoor unit normally acts as a router/firewall between these.
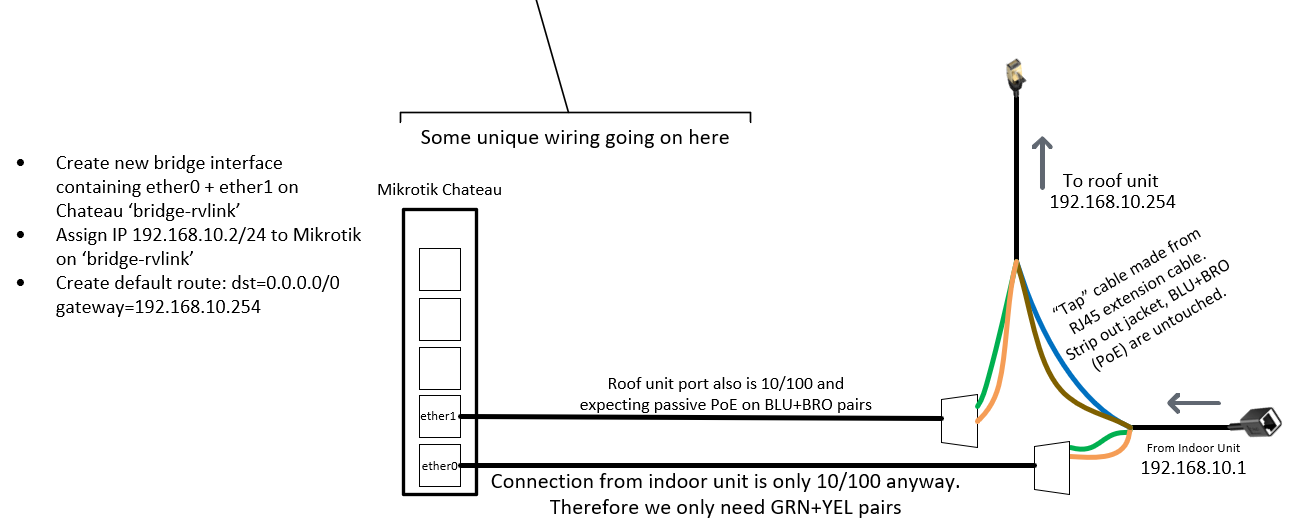
The solution involves a physical modification – a "network tap" created from an ethernet extension cable placed between the indoor and roof units:
- PoE Pass-through: The PoE pairs (Blue/Brown) will be carefully isolated and left untouched in a typical ethernet extension cable to allow the indoor unit to continue powering the roof unit uninterrupted.
- Data Interception: The Data pairs (Orange/Green) will be cut and each end will then be punched into a keystone jack. Allowing them to be run through the MikroTik router (using two Ethernet ports configured as a bridge) or an intermediary switch connected to the MikroTik.
This will effectively place the MikroTik on the same Layer 2 network (192.168.10.x) as the roof unit, allowing direct API calls, while still leveraging the indoor unit for power.
MikroTik Configuration Outline:
- Create a bridge (
bridge-rvlink). - Add the two ports connected to the tapped data lines (one towards the roof unit, one towards the indoor unit's connection) to the bridge.
- Assign a static IP address from the RVLink subnet (e.g.,
192.168.10.2/24) to the bridge interface. - Add a default route
0.0.0.0/0pointing to the roof unit's IP (192.168.10.254) when it's the desired gateway.
This setup also allows using the MikroTik's sniffer tool to capture traffic between the units for further analysis. More to come on this in part 2
Security Sideline: Vulnerability Check
During the investigation, Nmap scans and version checks revealed some potential security weaknesses on the roof unit:
- SSH (Dropbear 2014.65): Requires weak legacy crypto. Default credentials failed. Version is potentially vulnerable to known RCEs like CVE-2016-7406 (Format String).
- HTTP (Nginx 1.4.7): Version is old. A Path Traversal vulnerability was confirmed (
http://.../image/../js/system.js), allowing retrieval of some files readable by the webserver process (though accessing sensitive files like/etc/passwdfailed, possibly due to permissions or backend issues). - DNS/DHCP (Dnsmasq 2.72): Version is vulnerable to significant issues like DNSpooq (RCE, Cache Poisoning) and the CVE-2017-14491 set (RCE, Info Leak).
(Disclaimer: Exploring vulnerabilities should be done responsibly and ethically. On your own shit. Don't be stupid.)
Putting It Together: Python & MikroTik Integration
With direct network access via the tap and the API understood, a Python script using the requests library was developed to:
- Authenticate to the API.
- Perform Wi-Fi scans.
- Connect to a selected Wi-Fi network using
motorhome_config_set.- (Note: The script needs to decide whether to also send the
/data/set_setting.htmlnotification to the indoor unit for persistence, or find an alternative roof-unit-only commit method if one exists).
- (Note: The script needs to decide whether to also send the
- Query connection status, LTE status, etc.
- Trigger reboots if needed.
The final goal is to integrate this Python script (or equivalent RouterOS scripting) with the MikroTik Chateau:
- Use the RVLink roof unit (controlled via API over the network tap) as the primary WAN interface.
- Configure the Chateau's built-in LTE modem (lte1) as a failover WAN.
- Implement policy routing rules (e.g., force specific devices over LTE only during failover).
- Develop a strategy for handling campground captive portals post-connection via the API.
Conclusion & Next Steps
This journey successfully reverse-engineered the basic API of the RVLink RV2400 roof unit and developed a plan for a physical network tap method to gain direct control, bypassing the limitations of the standard indoor controller. Linking the hardware to specific Comfast models provided valuable context.
While programmatic control over scanning and initiating Wi-Fi connections is achieved, outstanding tasks remain:
- Actually constructing the network tap and verifying it works
- Confirming the roof unit can actually be used as a gateway for internet traffic originating from the Mikrotik
- Refining the connection script (handling the "commit" issue). Use flask to wrap all of this logic up and present a cleaner API to make things easier on the Mikrotik side.
- Attempting SSH access (brute-force or exploring vulnerabilities).
- Developing robust MikroTik scripting for roaming and failover.
This project highlights how even closed consumer networking systems can often be understood and controlled with persistence, network analysis, and a bit of hardware modification.