From Bare-Metal to Proxmox: Migrating My Server Written as a Complete P2V Guide for Debian, MergerFS, and SnapRAID

Introduction
I had a problem that many home-server enthusiasts eventually face: my critical, 24/7 bare-metal Debian server had become a fragile "pet." It was running dozens of Docker containers, managing a large storage array with MergerFS and SnapRAID, and I was just waiting for an apt upgrade to bork something. The goal was to migrate this entire system to Proxmox VE, gain the flexibility of virtualization, and make my server resilient.
This wasn't a simple "P2V" (Physical-to-Virtual) job. A simple disk image wouldn't work because of the complex software RAID. The solution? A hybrid approach.
The Goal: Migrate the Debian OS into a VM but move the entire storage layer (MergerFS and SnapRAID) to the Proxmox host itself (I know the purists will scoff at this but it's my server not some 5-nines enterprise setup). The VM would then access its data from the host via a high-performance share.
The Outcome: Success! After a few hardware surprises and some classic Linux troubleshooting, the old server is now a stable VM. The Proxmox host manages the entire storage array, and the VM (and its Docker containers) access their data seamlessly. This guide will walk you through the entire process, including every command and troubleshooting step I hit along the way.
Prerequisites
Before you start, make sure you have the following:
- Hardware:
- Your existing server with its Debian OS drive and all storage/parity drives.
- A new, dedicated boot drive for Proxmox (I used a new 2TB NVMe).
- A way to have both your new Proxmox drive and your old Debian OS drive connected at the same time for the cloning step. (I hit a snag with only one M.2 slot and had to use a USB-C M.2 enclosure for my new Proxmox drive temporarily).
- Software:
- The latest Proxmox VE Installer ISO.
- A USB stick to create the bootable installer.
- Crucial: Full backups of your
/etc/fstaband/etc/snapraid.conffiles from your old Debian server.
Of course, a lot of this guide can be applied generally to other distributions, especially the P2V portion. I'm providing the details of my setup for clarity.
Phase 1: Install Proxmox & Configure Repositories
This is the foundational step. We'll get Proxmox installed and configured before we touch anything else.
Step 1.1: Install Proxmox VE
Boot from your Proxmox installer USB and install it onto your new, dedicated boot drive. (In my case, this was the NVMe drive in the USB-C enclosure). The installation wizard is very straightforward.
Step 1.2: Fix apt Repositories
Once Proxmox is installed and you've rebooted, log in to the web interface (e.g., https://[IP]:8006). Go to your host (talos in my case), and open the >_ Shell.
You'll immediately notice apt update fails because it's looking for a paid enterprise repository. We need to disable this and add the free, "no-subscription" repository.
- Disable the Enterprise Repo
nano /etc/apt/sources.list.d/pve-enterprise.sourcesComment out all lines by adding a # at the beginning:
#Types: deb
#URIs: https://enterprise.proxmox.com/debian/pve
#Suites: trixie
#Components: pve-enterprise
#Signed-By: /usr/share/keyrings/proxmox-archive-keyring.gpg- Disable the Ceph Repo (Optional): I'm not using Ceph, so I disabled it.
nano /etc/apt/sources.list.d/ceph.sourcesComment out all of the lines
#Types: deb
#URIs: https://enterprise.proxmox.com/debian/ceph-squid
#Suites: trixie
#Components: enterprise
#Signed-By: /usr/share/keyrings/proxmox-archive-keyring.gpg- Add to No-Subscription Repo:
nano /etc/apt/sources.list.d/proxmox.sourcesTypes: deb
URIs: http://download.proxmox.com/debian/pve
Suites: trixie
Components: pve-no-subscription
Signed-By: /usr/share/keyrings/proxmox-archive-keyring.gpgStep 1.3: Update The Host
ow, run your update and (optionally) upgrade.
apt update
apt upgrade
Phase 2: Migrate Storage Control to the Host
This is the most critical part of the migration. Instead of passing through hardware (which is complex), we will re-create our exact mergerfs and snapraid setup on the Proxmox host itself.
Step 2.1: Install Storage Tools
In the host's shell, install the packages.
apt install -y mergerfs snapraidStep 2.2: Get Your Old Configs
We need the fstab and snapraid.conf files from the old Debian drive. I connected my old OS drive to the server (you may need to shut down to do this) and found it at /dev/sdj.
- Create a temporary mount point:
mkdir -p /mnt/scratch- Mount the old OS read-only: (My root partition was
/dev/sdj2)
# 'ro' option mounts it read only just in case ;)
mount -o ro /dev/sdj2 /mnt/scratch- Copy the configs:
cp /mnt/scratch/etc/snapraid.conf /etc/snapraid.confDuring my migration I did not just copy the fstab from the old drive to the new system. The freshly installed Proxmox system had just minted it's own fstab during install and I did not see the utility in overwriting that only to have to re-create it. So I simply copied the relevant entries from my old fstab to a scratch pad to use for the next step.
# Surveillance HDD
UUID=04c23eed-2752-4da8-8ee0-cd4c968e26ab /mnt/FREAK_VISION     ext4    defaults                       0       0

# Individual data disks to combine with mergerfs
/dev/disk/by-id/ata-ST12000VN0008-2PH103_ZTN1BNEZ-part1         /mnt/disk-ZTN1BNEZ      ext4 defaults 0 0
/dev/disk/by-id/ata-ST12000VN0008-2PH103_ZLW0A3QJ-part1         /mnt/disk-ZLW0A3QJ      ext4 defaults 0 0
/dev/disk/by-id/ata-ST20000NM004E-3HR103_ZX22EJ3Y-part1         /mnt/disk-ZX22EJ3Y      ext4 defaults 0 0
/dev/disk/by-id/ata-ST8000NM0055-1RM112_ZA1GX9F4-part1          /mnt/disk-ZA1GX9F4      ext4 defaults 0 0
/dev/disk/by-id/ata-ST8000NM0055-1RM112_ZA1GW0XM-part1          /mnt/disk-ZA1GW0XM      ext4 defaults 0 0

# Parity disk for snapRAID here
/dev/disk/by-id/ata-ST20000NM004E-3HR103_ZX20AAMV-part1         /mnt/parity-ZX20AAMV    xfs  defaults 0 0
/dev/disk/by-id/ata-HGST_HUH721010ALE604_2TJ97M6D-part1         /mnt/parity-2TJ97M6D    xfs defaults 0 0
/dev/disk/by-id/ata-HUH721010ALE601_7JJVJ65C-part1              /mnt/parity-7JJVJ65C    xfs defaults 0 0

# mergerfs conglomerate
/mnt/disk* /mnt/storage fuse.mergerfs category.create=pfrd,direct_io,defaults,allow_other,minfreespace=50G,fsname=m>- Unmount for safety, we have what we need:
umount /mnt/scratchStep 2.3: Configure fstab on the Host
Now, the fstab entries we just grabbed from the current machine need added to /etc/fstab on the Proxmox host.
nano /etc/fstab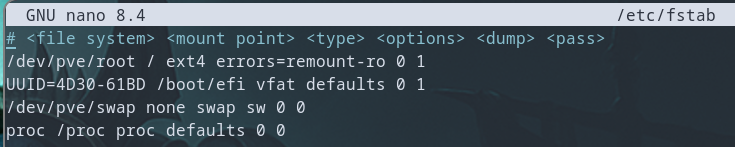
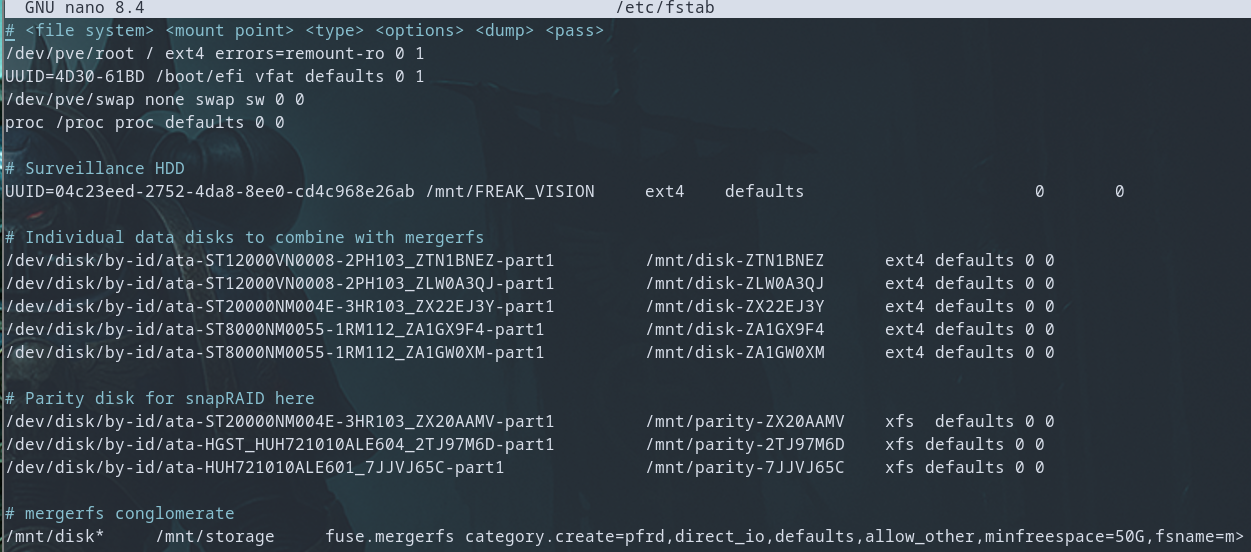
fstab looked like on the Proxmox host. Yes, there are 10 hard drives in my server.Crucially, before we can do anything else, those mount points need to exist. So, I created them:
# Create mounts for the data disks
mkdir -p /mnt/disk-ZTN1BNEZ
mkdir -p /mnt/disk-ZLW0A3QJ
mkdir -p /mnt/disk-ZX22EJ3Y
mkdir -p /mnt/disk-ZA1GX9F4
mkdir -p /mnt/disk-ZA1GW0XM

# Create mounts for the parity disks
mkdir -p /mnt/parity-ZX20AAMV
mkdir -p /mnt/parity-2TJ97M6D
mkdir -p /mnt/parity-7JJVJ65C

# Create the final mergerfs mount point
mkdir -p /mnt/storage
Step 2.4: Configure snapraid.conf
/etc/snapraid.conf (which we just copied) should work without changes since all the mount paths are identical.
Step 2.5: Test the Array
This is the moment of truth.
# Reload systemd to recognize new fstab entries
systemctl daemon-reload

# Mount everything
mount -a

# Check if your mergerfs pool is working
ls /mnt/storage
Verifying SnapRAID is working
root@talos:/etc/apt/sources.list.d# snapraid status
Self test...
Loading state from /var/snapraid.content...
Using 1674 MiB of memory for the file-system.
SnapRAID status report:

   Files Fragmented Excess  Wasted  Used    Free  Use Name
            Files  Fragments  GB      GB      GB
   11735      26      36       -    4834    6388  43% d1
   18490      72     106       -    8686    9785  47% d2
   11774      22      31       -    4688    6559  41% d5
    7711      25      31       -    3197    4351  42% d6
    7918      54      68       -    3133    4374  41% d7
 --------------------------------------------------------------------------
   57628     199     272     0.0   24541   31458  43%


 12%|o      o       o       *              o      o                      o
    |*      *       *       *      o       *      *                      *
    |*      *       *       *      o       *      *                      *
    |*      *       *       *      *       *      *                      *
    |*      *       *       *      *       *      *                      *
    |*      *       *       *      *       *      *                      *
    |*      *       *       *      *       *      *                      *
  6%|*      *       *       *      *       *      *                      *
    |*      *       *       *      *       *      *                      *
    |*      *       *       *      *       *      *       o              *
    |*      *       *       *      *       *      *       *              *
    |*      *       *       *      *       *      *       *              *
    |*      *       *       *      *       *      *       *              *
    |*      *       *      o*      *       *      *       *              *
  0%|*______**______**_____o*______*_______*______**______*______o_______*
     9                    days ago of the last scrub/sync                0

The oldest block was scrubbed 9 days ago, the median 5, the newest 0.

No sync is in progress.
4% of the array is not scrubbed.
No file has a zero sub-second timestamp.
No rehash is in progress or needed.
No error detected.
The files are visible and SnapRAID is reporting no errors which completes "phase 2". Proxmox is now fully in control of the storage pool.
Phase 3: The P2V (Physical-to-Virtual) Migration
Now we'll clone the old OS into a new VM.
Step 3.1: Create the VM "Shell"
In the Proxmox UI, click "Create VM":
- General: Give it a name (I used
NALTHISas that's the current hostname. Shout out Brandon Sanderson) and note the VM ID (e.g.,100). - OS: Select "Do not use any media".
- System: Change BIOS to
OVMF (UEFI)and check "Add EFI Disk". - Disks: Create a new disk (
vm-100-disk-1) on your Proxmox boot drive. Make it the same size as your old OS drive (e.g., 1000 GB). UseVirtIO Block. - CPU/Memory/Network: Set as desired.
- Click Finish. Do not start the VM.
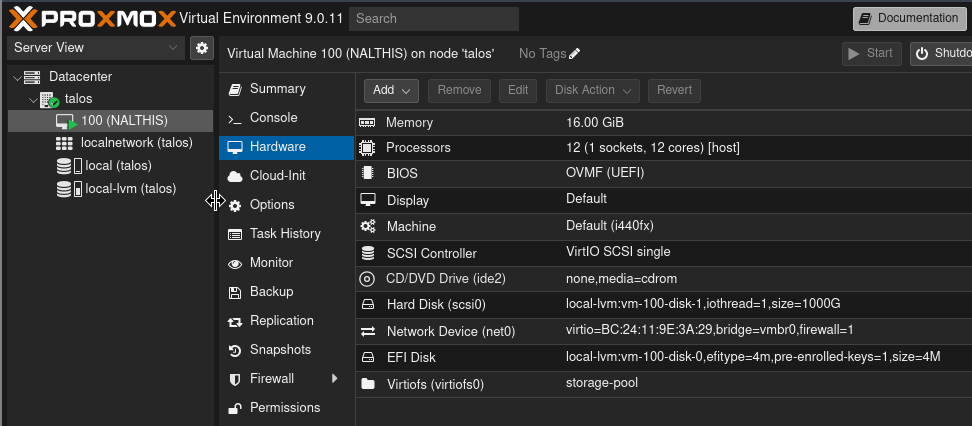
Step 3.2: Clone the Old OS
Back in the Proxmox host shell, we'll perform a block-level copy using dd.
- Identify Disks:
- Old OS Drive:
/dev/sdj - New VM Disk: Find this path. On my LVM setup, it was
/dev/pve/vm-100-disk-1. (Note:vm-100-disk-0is the tiny EFI disk,vm-100-disk-1is the main one).
- Old OS Drive:
- Run the
ddcommand: We usebs=64Mfor a much faster transfer than the default.
dd if=/dev/sdj of=/dev/pve/vm-100-disk-1 bs=64M status=progressWe love disk destroyer
Good old disk destroyer... This is going to take a minute. Go grab a coffee.
Step 3.3: Handle the IP Conflict
My old server's IP (192.168.88.5) was set by a static DHCP lease. Naturally the Proxmox host was also assigned this IP because that is the address my router gave to the installer on boot (which it then configured statically for itself). Before we boot the VM, we must move the Proxmox host to a new IP.
- On the Proxmox Host, edit the network config:
nano /etc/network/interfacesChange the address to your desired IP (e.g. 192.168.88.4)
- Edit the hosts file:
nano /etc/hostsYou'll see the old IP in 1 or more of the hostname entries in here, update them all.
- Reboot
Rebooting is simply the most reliable way to apply these changes. Note you'll need to access the Proxmox UI from the new IP now.
Step 3.4: Add VirtIO-FS Storage
In the Proxmox UI, go to your new VM (NALTHIS) > Hardware > Add > VirtIO-FS.
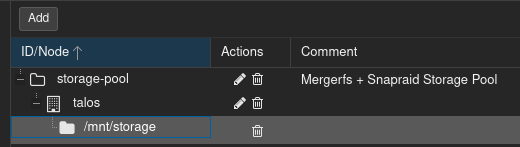
storage-pool to the path /mnt/storage on the Proxmox host for use with VirtIO-FS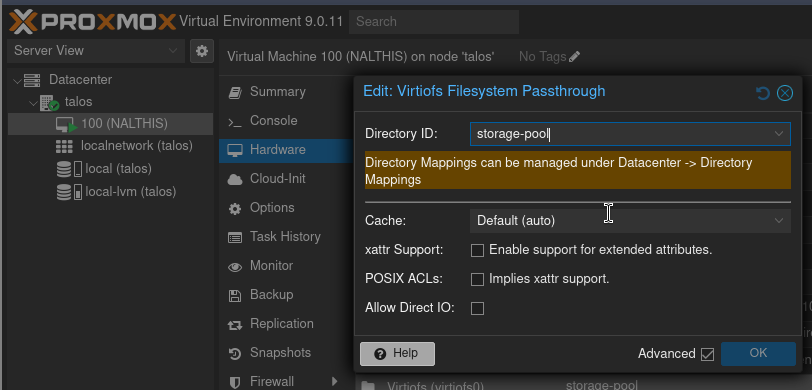
Phase 4: Troubleshooting the First Boot
Start the VM. It will probably fail. Here's how I fixed every error.
Problem 1: "No bootable option or device was found."
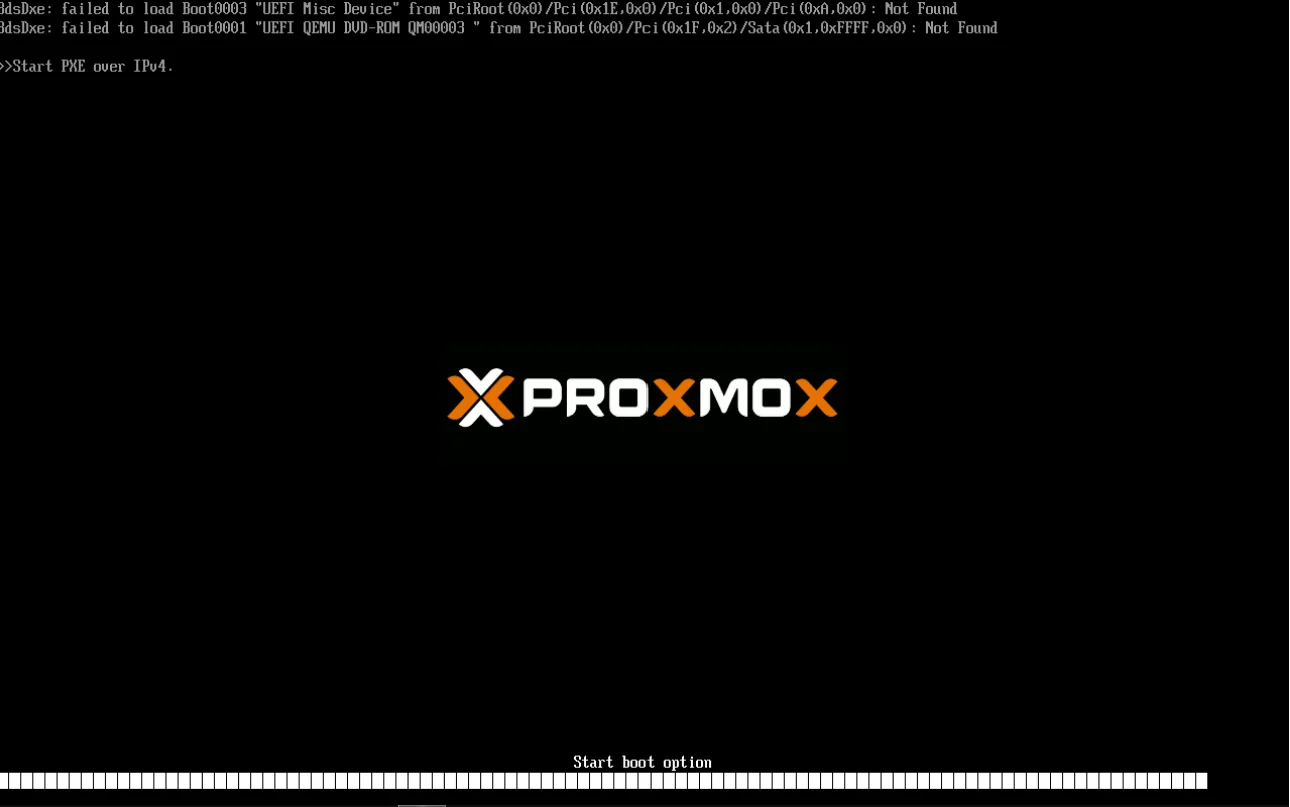
- Cause: The
ddcopied the files, but the new virtual motherboard's UEFI doesn't know where the bootloader is. - Solution:
- Restart the VM and press
ESCat the logo to enter the UEFI menu. - Go to Boot Maintenance Manager > Boot From File.
- Select the entry for your main disk.
- Navigate the file browser to
\EFI\debian\grubx64.efi(or potentially ashimentry) and press Enter. - The VM will now boot.
- Restart the VM and press
Problem 2: "You are in emergency mode."
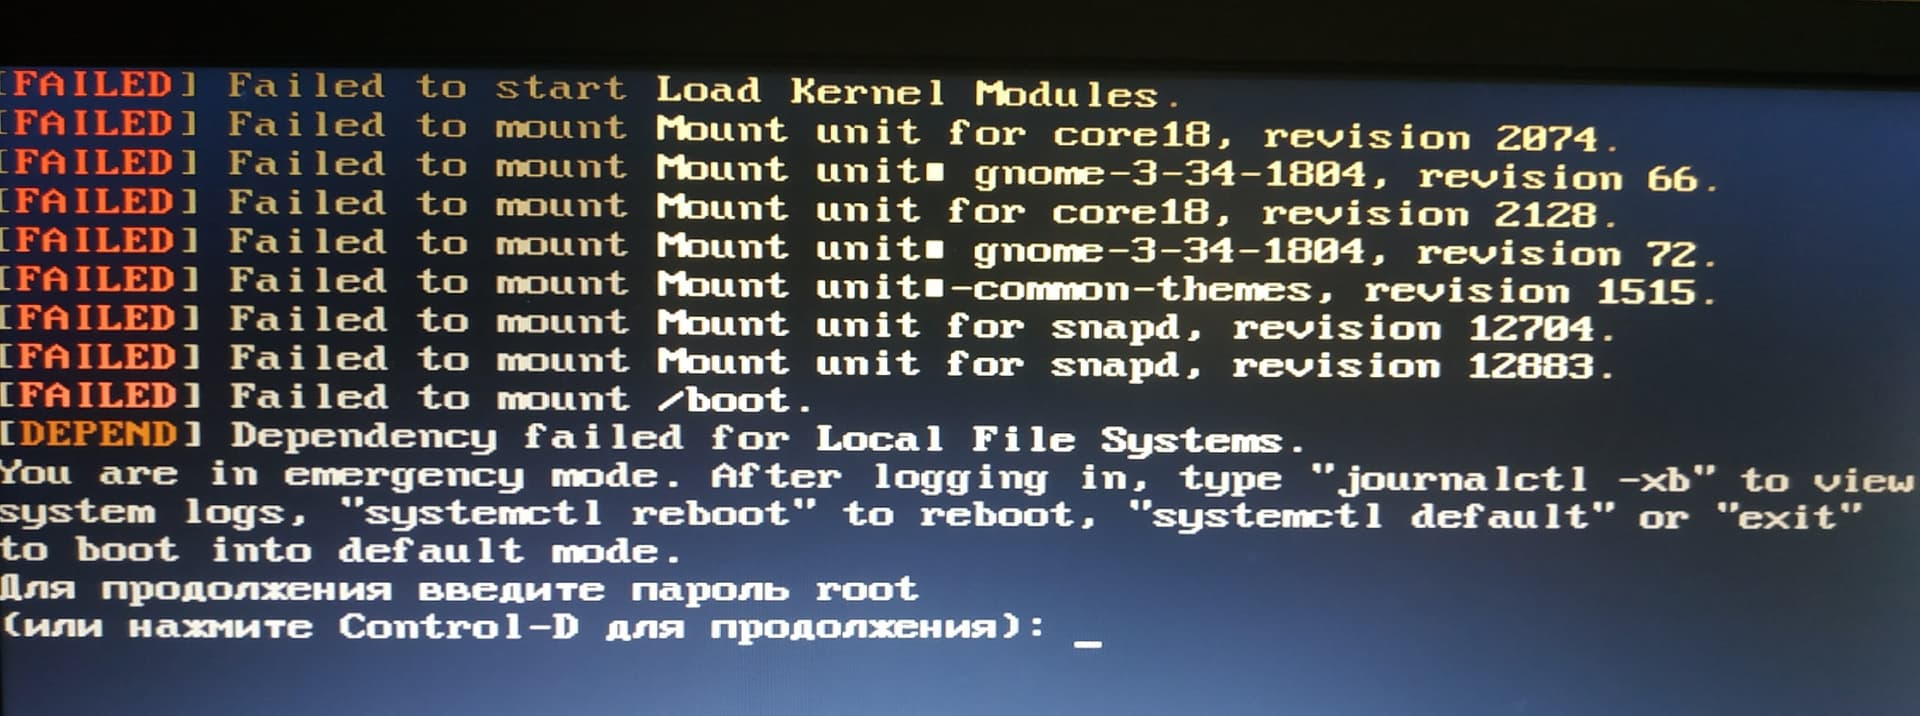
- Cause: The VM is now booting, but its
fstabis trying to mount all the old physical storage/parity drives, which don't exist. More technically, anyfstabentries that do specifynofailthat are now failing to mount are causing the system to drop you into emergency mode. - Solution:
- At the emergency prompt, enter your
rootpassword. - Edit the VM's
fstab:nano /etc/fstab - Comment out (with a
#) every old line: all/mnt/disk-*,/mnt/parity-*, and the oldmergerfsline. - Add this new line at the bottom to mount the storage from the host:
- At the emergency prompt, enter your
storage-pool /mnt/storage virtiofs defaults,nofail 0 0I probably should remove nofial from this now that everything is working...
Note that instead of a block device in /dev or folders in /mnt it is simply the name we gave the storage pool when configuring it in Proxmox, very cool.
Problem 3: No Network / "Temporary failure in name resolution"
- Cause: The VM's network config is still looking for the old physical network card (e.g.,
enp9s0). The new virtual card has a different name (e.g.,eth0). - Solution:
- Find the new card name:
ip a(Look foreth0orens18). - Edit the network config:
nano /etc/network/interfaces - Find the block for your old card and change the name to the new one (e.g., change
auto enp9s0toauto ens18). - Manually bring the interface up:
- Find the new card name:
ip link set ens18 up
dhclient ens18

# Should now have an ip
# test
ping 8.8.8.8
Problem 4: "grub-install: command not found."
- Cause: We still need to make the bootloader fix permanent, but the
grub-installcommand is missing. - Solution:
- Install the package:
apt install grub-efi-amd64 - Run the bootloader fix
- Install the package:
grub-install --target=x86_64-efi --efi-directory=/boot/efi --bootloader-id=debian

update-grub
reboot and the VM ought to come up without any manual intervention now.
Problem 5: Docker Error: "/dev/kvm: no such file or directory"
- Cause: A few Docker containers (and seemingly
Dockcheck.sh) needed hardware virtualization, but the VM doesn't have permission to access it. - Solution:
- Shut down the VM.
- In the Proxmox UI, go to the VM > Hardware > Processors.
- Change the Type from
qemu64tohost. - Start the VM.
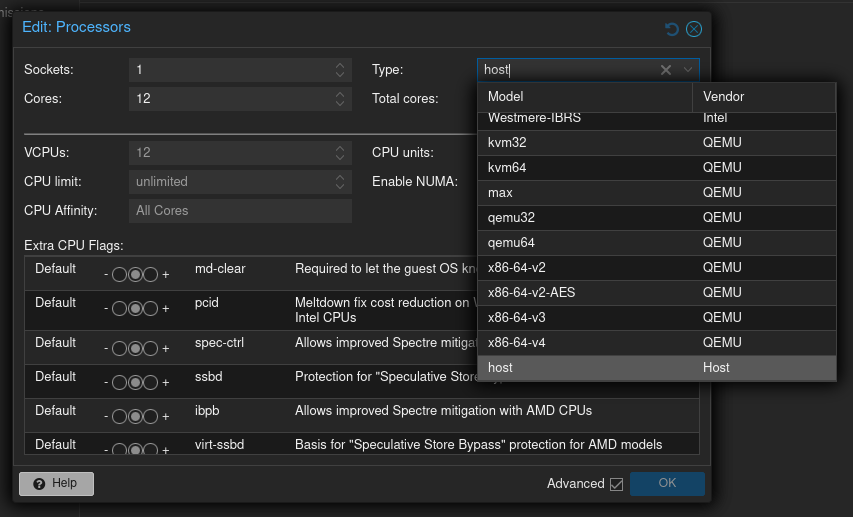
Phase 5: Finalizing Hardware and Automation
The system is stable on the USB-C drive, but it's time to make it permanent.
Step 5.1: Swapping the M.2 Drive
I shut down the Proxmox host, moved the new NVMe from the USB-C enclosure to the internal M.2 slot, and unplugged my old Debian OS drive for good.
Troubleshooting: Host Network is Down After Swap!
- Cause: Booting from the internal slot changed the PCI device order. Linux renamed my physical network card (from
enp9s0toenp10s0). The Proxmox bridge (vmbr0) was still looking for the old name. - Solution:
- Log in to the Proxmox host console (directly on the machine).
- Find the new name:
ip a - Edit the host's network config:
nano /etc/network/interfaces - Update the
bridge-portsline to use the new name (e.g.,bridge-ports enp10s0). reboot. The host network came right back up.
Step 5.2: Automating SnapRAID on the Host
My snapraid-runner.py script and cron job were on the old VM, but they must run on the host now.
- Place the files: I created
/opt/snapraid-runneron the host and placedsnapraid-runner.pyandsnapraid-runner.confinside.
mkdir -p /opt/snapraid-runner
# ... create/paste files ...
chmod +x /opt/snapraid-runner/snapraid-runner.py- Edit
snapraid-runner.conf: I had to fix two paths in the config file.
nano /opt/snapraid-runner/snapraid-runner.conf- Change
executable = /usr/local/bin/snapraidtoexecutable = /usr/bin/snapraid(becauseaptinstalls it here). - Change
file = /home/hoid/snapraid.logtofile = /var/log/snapraid-runner.log(a more standard path).
- Set up the Cron Job: On the host, edit the root crontab:
crontab -e

# add a line for snapraid-runner.py
00 06 * * * /usr/bin/python3 /opt/snapraid-runner/snapraid-runner.py -c /opt/snapraid-runner/snapraid-runner.conf- Test Run: I ran the command manually to test it.
# Testing command I scheduled in the crontab

/usr/bin/python3 /opt/snapraid-runner/snapraid-runner.py -c /opt/snapraid-runner/snapraid-runner.conf
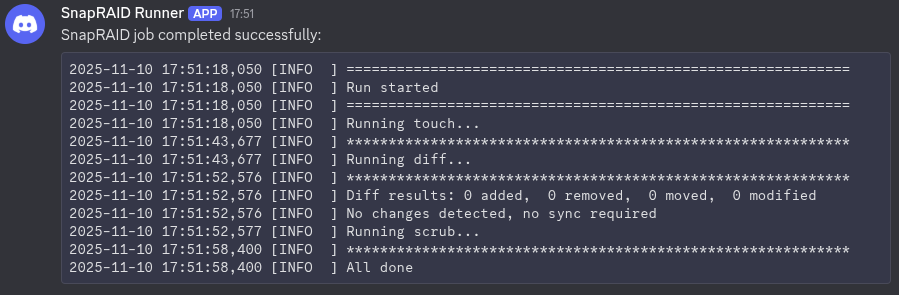
A moment later, I received a successful notification in Discord. Migration complete.
Conclusion
This migration was a massive success. The bare-metal server is now a stable "monolith" VM, and the Proxmox host is handling the entire storage array rock-solidly. The system is now resilient, I can take snapshots of the VM before running updates, and the hardware is finalized.
The best part? Now that the old system is safely in a VM, I can start the next project: building a brand new, clean Arch Linux VM alongside the old one, slowly migrating my Docker containers, and eventually decommissioning the old Debian monolith, all with zero downtime for the family.
SEO Tags/Keywords
- Proxmox
- P2V Migration
- Debian
- MergerFS
- SnapRAID
- Proxmox Tutorial
- VirtIO-FS